Monday, May 18, 2009

Right Click, Send to USB in Nautilus

I did this script on Ubuntu 9.04. So any mentions of installation etc. will be specific to Ubuntu. Before I describe the guts of doing it, let me tell you straight that this feature has already been implemented in Ubuntu 9.04, Jaunty Jackalope. I did this script based on a question I found on linux.com
On to the script, then:

First, you have to install Nautilus Actions Configurations Package. It allows easy and graphical editing of Nautilus' right click menus.
sudo apt-get install nautilus-actions
Next, create the file copy.sh and save it in a location of your preference. For the purpose of this example, I'll use /home/bob/.

Here's the listing for copy.sh

#!/bin/bash
#First, get the name of the device as in sdb, sdc etc
name=`dmesg|grep removable|awk '{print $5}'|sed -e 's/\[\([a-z][a-z]*\)\]/\1/'|sort|uniq`

#Select only those devices which are mounted
name=`mount | grep -Z "$name" | awk '{print $1}'`

if [ ! $name ]; then
exit 1;
fi

#Find the mount points of mounted devices
#ie, if there exists a removable drive
mpoint=`mount | grep "$name" | awk '{print $3}'`

#Find the number of devices
num_device=`for FN in $name; do echo $FN; done | wc -l`

#Display a selection menu if there are multiple devices present
if [ $num_device -gt 1 ]; then
for FN in $mpoint;
do
string=$string" FALSE "$FN;
num_device=$((num_device-1))
done
selection=`zenity --title "Select a USB Device" --text "Please Choose one of the following USB Devices to send the selection to" --list --radiolist --column "Select" --column "Mount Point" $string`;
else
#else copy to the available device
selection=$mpoint;
fi

#For each of the selected files, copy them
for FILE in "$@"
do
/bin/cp -r $FILE $selection;
done

Make code executable chmod +x /home/bob/copy.sh

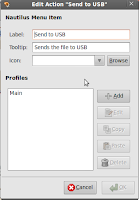
Now, having saved copy.sh/home/bob/, open up Nautilus Actions Configuration from System->Preferences->Nautilus Actions Configuration. Click on Add. In the "Add a New Action" Window that pops up, fill in the details of the menu item. Like Label, the tooltip - The piece of text that you see at the bottom of Nautilus once you highlight the label and an optional icon.

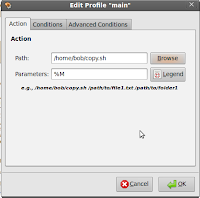
In the Profiles section, highlight "Main" and click on Edit. In the Path text box, enter the full path to copy.sh, ie, in this case /home/bob/copy.sh. In the parameters tab, enter %M. To know more about parameters, click on Legends to get a pop up. The pop up can be closed by clicking on Legends again.

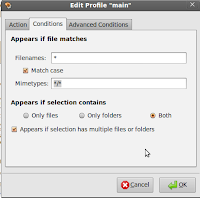
In the Conditions tab, under "Appears if selection contains", select "Both". Check the option "Appears if Selection has multiple files and folders". Click on OK and you are done.

To see the option in the right-click menu, you will have to kill all instances of Nautilus running killall -HUP nautilus, or log out and login again.

I tested the script with only a single USB. It should work for multiple ones too if plugged in together. On the occasion that multiple Removable Disks are present, the script will ask for a selection from the user.

Labels: ,

Sunday, May 10, 2009

Crazy Chatting with Chatbot::ELIZA

Chatbot::Eliza is a perl module that implements the famous ELIZA program created by Joseph Weizenbaum.

Chatbot::Eliza has a object type structure, which enables it to hook up with any interface. A very trivial command line implementation of the bot would take up only four lines of code and it goes like this :

#!/usr/bin/perl
use Chatbot::Eliza;
$bot = new Chatbot::Eliza("Jack", "");
$bot->command_interface();

This will initiate a new bot talking with you on the command line. Our bot, Jack in this case, would begin with the classic question: "Please tell me whats bothering you?". And you know what happens next. The mindless ramblings of the bot.

When I first saw this module, the only interesting use I found of it is to hook it up with my gmail account. Since then, a lot of my contacts have talked with either Ms. Jill or Mr. Jack.

Connecting to GTalk with Perl is a trivial issue. It requires a few perl modules such as

  • IO::Socket::SSL (>=0.81 ?)

  • XML::Stream

  • Net::XMPP

  • Authen::SASL


Use the CPAN commandline shell to install them. Enter the command line shell by typing

perl -MCPAN -e shell

Now install the modules one by one using the command

install module_name

And of course you also need the Chatbot::Eliza module.
With all the requisite modules installed, you are ready to connect your bot with GTalk.
Here's the listing I used for the Eliza-gmail-chatter:


#!/usr/bin/perl -w

use strict;
use Net::XMPP;
use Chatbot::Eliza;

my $bot = new Chatbot::Eliza("Jill","");
my $message;
my $body;
my $JID;
my $userid;
my $username = "xxxxxxxxxxxxxxxx"; #Supply your gmail username here
my $password = "xxxxxxxxxxxxxxxx"; #Supply your gmail password here
my $resource = "ChatBot";

my $hostname = 'talk.google.com';
my $port = 5222;
my $componentname = 'gmail.com';
my $connectiontype = 'tcpip';
my $tls = 1;

my $Connection = new Net::XMPP::Client();

$Connection->SetCallBacks(message=>\&doit);

my $status = $Connection->Connect(
hostname => $hostname, port => $port,
componentname => $componentname,
connectiontype => $connectiontype, tls => $tls);

if (!(defined($status))) {
print "ERROR: XMPP connection failed.\n";
print " ($!)\n";
exit(0);
}

# Change hostname
my $sid = $Connection->{SESSION}->{id};
$Connection->{STREAM}->{SIDS}->{$sid}->{hostname} = $componentname;

# Authenticate
my @result = $Connection->AuthSend(
username => $username, password => $password,
resource => $resource);

if ($result[0] ne "ok") {
print "ERROR: Authorization failed: $result[0] - $result[1]\n";
exit(0);
}
$Connection->PresenceSend();
$body = $bot->{initial}->[0];
$Connection->MessageSend(to=>"xxxxxxxxxxxx\@gmail.com",body=>$body); #Supply your contact's
#gmail id here
undef $userid;
while (1) {
$Connection->Process();
if (defined ($userid)) {
$Connection->MessageSend (to=>"xxxxxxxxxxx\@gmail.com", body=>$body); #Supply your contact's
#gmail id here
print "Me(as the chatbot) (to $userid): ", $body, "\n";
}
}
sub doit
{
my ($SID, $Mess) = @_;
$JID = new Net::XMPP::JID($Mess->GetFrom());
$userid = $JID->GetUserID();
print $userid, " : " , $Mess->GetBody(), "\n";
$body=$bot->transform($Mess->GetBody());
}


You can have a laugh riot from your terminal watching your contact talking with the Chatbot. Make sure that you inform the contact later about who talked.

Chatbot::Eliza has a peculiar effect of making not wanting to talk with her ever again.

Try it for yourself.
Happy Chattin' Fun !

Labels: , ,

Friday, May 8, 2009

Quitting Microsoft

Quitting the Microsoft Windows platform and moving on to greener, finer pastures is a lot like quitting smoking. Once you begin it, once you understand its clumsy user interface (which is highly restricted), once you get around easily with a "Aha....!", there is no going back. Not unless you are extremely committed to it.

Most of the average Joes out there know that the Wintel platform they are using taxes them heavily, both economically and productively, but merely disposes them as daily hurdles of a computer user. The computer hangs once in a while. They begin the 3-step process to recover it :
Step 1: Press Ctrl-Alt-Del. Three finger salute!
Step 2: Bang on the cabinet. BAM! Boom! "Ey ey.. What a Fu*king thing ???"
Step 3: Press the reset button.
Maybe it is a gift, or maybe it is programmed so, whatever you do, the third step gets you right back to what you were doing before the computer hung. You can enjoy almost an hour of freedom and work until the cycle repeats.

Everybody knows it, but tolerates with it. Has it got something to do with human psychology? The majority of us are happy to voice our opinions from within a crowd, but are silent when asked personally for an opinion. Does the same thing happen here too? Are you using Windows because your parents, friends and neighbors are using it? Are you using it because you are not technically savvy enough?

The latter is a more common problem. People believe to be technically incompetent, thus branding a lot many things too geeky and among them the GNU/Linux system. What one needs to understand is that computer skills are acquired, not inherent. Thus everyone has an equal chance of acquiring the skills. By everyone, I meant all those who have access to the Internet. The Internet, the connection of networks of computers holds enormous resources to get anyone upto speed on any existing technology.

Thus in my opinion, quitting Windows takes only the time needed to understand the basics of installing another operating system, be it GNU/Linux, Mac OSX or even the obscure Plan 9 from Bell Labs! We are living in an age of information explosion. Why bind ourselvers to the slavery of proprietary, monopolistic companies when we have the freedom of choice, expression and code just an install away ?

To quote Karl Marx, "The proliterates have nothing to lose, but their chains!". (Read the proliterates as Internet browsing guys!!)

Comments ??

Labels: ,

Tuesday, May 5, 2009

gnokii and Nokia 3110c

Ever wondered how to use your phone with GNU/Linux as you use it with Nokia Mobile Suite in Windows ? Ever wanted to backup contact books, appoinments, sms and all other personal things the easy way in a GNU/Linux environment ?

If you do wonder, friend, you are foreign to gnokii.
gnokii provides tools and a user space driver for use with mobile phones under various operating systems operating systems. It allows you to communicate with the phone over a serial cable, usb, IR or even bluetooth. gnokii also provides the functionality to manipulate the phone over this connection.

Why did I chose Nokia 3110c ?
The primary reason is that it is the phone that I own. Another reason is that this particular phone uses a DKU-2 cable. DKU-2 is nothing other than a fancy name for the common USB to mini-USB cable ! I was interested in USB devices working with GNU/Linux, I guess.

Hoping that you are competant enough to install gnokii either from source or from your distro's custom repositories, let us proceed to the juicy part. As with all good things free, the first thing that you will need on a fresh installation of gnokii is a good configuration file, aptly named .gnokiirc

Fire up your favorite text editor (mine is Vim) and type in the configuration details.
Here's how my config file looks like

[global]
port = /dev/ttyACM0
model = 3110c
initlength = default
connection = dku2libusb
use_locking = yes
serial_baudrate = 19200
smsc_timeout = 10
bindir = /usr/local/sbin/


The port determines which port the PC uses for connecting with the phone. On connecting the phone with the PC and selecting "Nokia Mode" a new node is created by the system in /dev. You can use the output of dmesg command to determine the port.
On issuing the dmesg command on a terminal, you will see an output similar to

.........
[ 1671.313624] cdc_acm 3-1:1.1: ttyACM0: USB ACM device
..........

Use the port value obtained thus. But normally, as I have seen in a number of systems, the default port will be /dev/ttyACM0.

Next up is the model name which is 3110c in this case.

initlength controls the number of characters sent to the phone during initialisation. Either "default" or a positive integer value is allowed. If it seems like the connection takes a long time, you can retry, entering a smaller positive value for initlength. But in most cases the value "default" will suffice.

connection determines the type of connection. With DKU-2 cable and the libusb driver, use a value of dku2libusb. It will work fine.

Leave the other options as they are seen. The serial_baudrate determines the speed at which serial communication takes place. The use_locking allows a type of flagging facility, disabling other operations while one is taking place. The smsc_timeout option determines the time to wait before a SMS send via the PC is acknowledged by the phone. The bindir is the path to various gnokiid libraries. For a default installation, the libraries are found at /usr/local/sbin. Change the value if you chose to install the libraries elsewhere.

With gnokii installed and .gnokiirc setup, connect the phone to the PC. When asked to choose the mode in the phone, choose "Nokia Mode".

How do you verify whether your phone is properly detected ? Open up a terminal and issue the following command

gnokii --identify
You will see the list of messages being sent back and forth between the PC and the phone

......................
......................
Received model RM-237
IMEI : XXXXXXXXXXXXX
Manufacturer : Nokia
Found model "RM-237"
Model : 3110c
Product name : RM-237
Revision : V 07.21
Serial device: closing device

This communication gives you the phone model, your IMEI number and the firmaware version you are using. If they are showing up correctly, you have successfully connected your phone with gnokii.

There are a lot of manipulations possible with gnokii. You can send sms, make voice calls etc. With some clever scripts and imagination, you can turn your phone into a remote management center !

Labels: , ,