Right Click, Send to USB in Nautilus
I did this script on Ubuntu 9.04. So any mentions of installation etc. will be specific to Ubuntu. Before I describe the guts of doing it, let me tell you straight that this feature has already been implemented in Ubuntu 9.04, Jaunty Jackalope. I did this script based on a question I found on linux.com
On to the script, then:
First, you have to install Nautilus Actions Configurations Package. It allows easy and graphical editing of Nautilus' right click menus.
Next, create the file
Here's the listing for
Make code executable
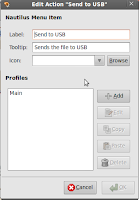
Now, having saved
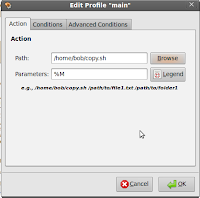
In the Profiles section, highlight "Main" and click on Edit. In the Path text box, enter the full path to
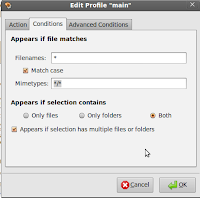
In the Conditions tab, under "Appears if selection contains", select "Both". Check the option "Appears if Selection has multiple files and folders". Click on OK and you are done.
To see the option in the right-click menu, you will have to kill all instances of Nautilus running
I tested the script with only a single USB. It should work for multiple ones too if plugged in together. On the occasion that multiple Removable Disks are present, the script will ask for a selection from the user.
On to the script, then:
First, you have to install Nautilus Actions Configurations Package. It allows easy and graphical editing of Nautilus' right click menus.
sudo apt-get install nautilus-actionsNext, create the file
copy.sh and save it in a location of your preference. For the purpose of this example, I'll use /home/bob/.Here's the listing for
copy.sh
#!/bin/bash
#First, get the name of the device as in sdb, sdc etc
name=`dmesg|grep removable|awk '{print $5}'|sed -e 's/\[\([a-z][a-z]*\)\]/\1/'|sort|uniq`

#Select only those devices which are mounted
name=`mount | grep -Z "$name" | awk '{print $1}'`

if [ ! $name ]; then
exit 1;
fi

#Find the mount points of mounted devices
#ie, if there exists a removable drive
mpoint=`mount | grep "$name" | awk '{print $3}'`

#Find the number of devices
num_device=`for FN in $name; do echo $FN; done | wc -l`

#Display a selection menu if there are multiple devices present
if [ $num_device -gt 1 ]; then
 for FN in $mpoint;
 do
  string=$string" FALSE "$FN;
  num_device=$((num_device-1))
 done
 selection=`zenity --title "Select a USB Device" --text "Please Choose one of the following USB Devices to send the selection to" --list --radiolist --column "Select" --column "Mount Point" $string`;
else
#else copy to the available device
selection=$mpoint;
fi

#For each of the selected files, copy them
for FILE in "$@"
do
/bin/cp -r $FILE $selection;
done
Make code executable
chmod +x /home/bob/copy.sh
Now, having saved
copy.sh/home/bob/, open up Nautilus Actions Configuration from System->Preferences->Nautilus Actions Configuration. Click on Add. In the "Add a New Action" Window that pops up, fill in the details of the menu item. Like Label, the tooltip - The piece of text that you see at the bottom of Nautilus once you highlight the label and an optional icon. In the Profiles section, highlight "Main" and click on Edit. In the Path text box, enter the full path to
copy.sh, ie, in this case /home/bob/copy.sh. In the parameters tab, enter %M. To know more about parameters, click on Legends to get a pop up. The pop up can be closed by clicking on Legends again.

In the Conditions tab, under "Appears if selection contains", select "Both". Check the option "Appears if Selection has multiple files and folders". Click on OK and you are done.
To see the option in the right-click menu, you will have to kill all instances of Nautilus running
killall -HUP nautilus, or log out and login again.I tested the script with only a single USB. It should work for multiple ones too if plugged in together. On the occasion that multiple Removable Disks are present, the script will ask for a selection from the user.
posted by em.techie at
11:19 PM
0 Comments





